
I have a special affinity with wooden artefacts. There’s a certain awe and appreciation for them which has its roots in the meshing of years of green woodworking and archaeology. All archaeological artefacts carry with them a weighty value that stems from simply being so old, but this is amplified in the case of preserved wood. The combination of age and the preservation process results in an object which seems so fragile it may crumble to dust if its touched, yet the sheer miraculous fact of its survival renders it significant. The conditions under which organic remains survive is so specialised that each object, no matter how mundane the purpose may originally have been, is special because of the glimpse into past peoples’ interactions with the most ubiquitous of materials: wood.
I first heard about this artefact and its repairs in the first lockdown of 2020, so when I felt I was presented with the options to either become obsessed with this bowl or to go slowly insane in isolation, the answer seemed evident. The immediate hook into my brain were the so-called ‘wavy rivets’, because the technology involved in their production seemed so mysterious to me. The next two years involved many failed experiments and lots of cracked bowls, eventually resulting in an authentically repaired replica of the original. I was very kindly invited up to Orkney to talk about my research and the process of making these repairs in Autumn 2022. Dr. Martin Carruthers of UHI, who excavated the original bowl, and I presented a talk on all aspects of the bowl at Stromness Museum and it was absolutely wonderful to be able to handle and photograph the bowl in person!
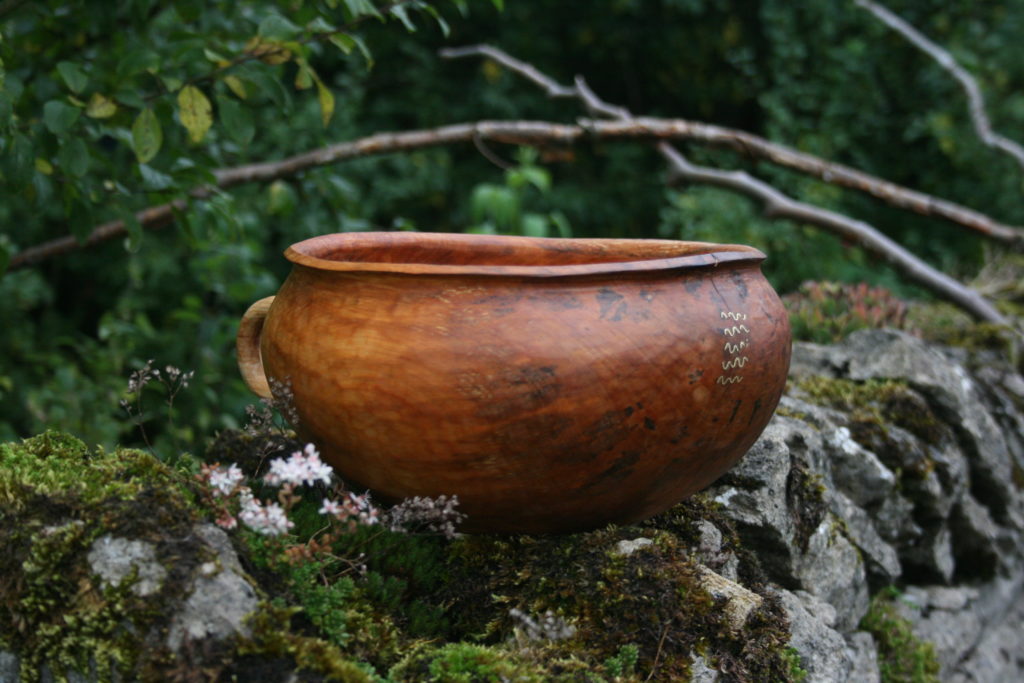
The Bowl
Excavations at The Cairns (South Ronaldsay, Orkney) in 2018 by the UHI Archaeology Institute unearthed a unique Iron Age wooden Bowl. This alder vessel is fascinating in so many respects, but it’s the technology of the wavy rivets I’ll focus on in this post.
Repairs
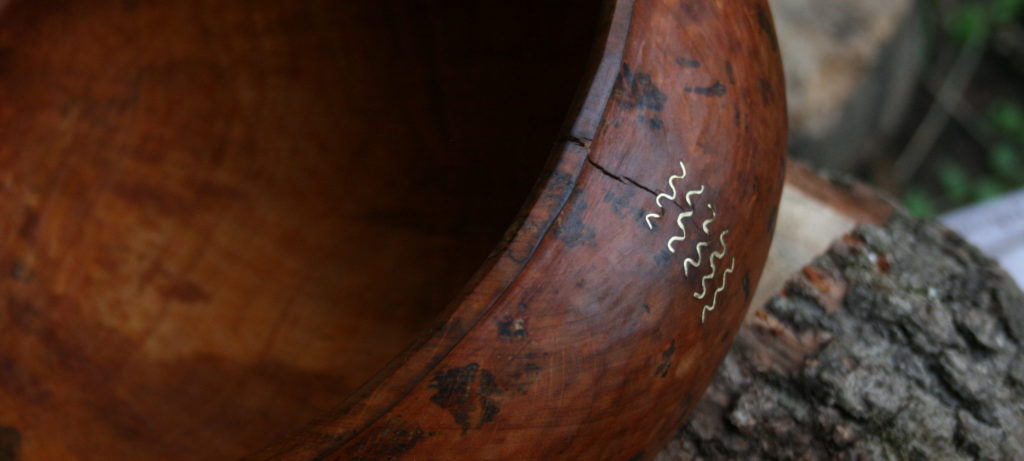
Two of the three types of repair will be relatively familiar to modern woodworkers, namely a riveted plate and staples covering cracks. This recognisable technique of using copper wire, or occasionally twine, to staple or sew over cracks to limit splitting certainly adds a lot to the artistic aesthetic of a bowl. However, it’s unfortunate that in order to do this you have to drill extra holes, rendering it nearly impossible to keep a vessel functional and leak-free. Rather ingeniously, the ‘wavy rivets’ on the Cairns bowl manage to get around this!
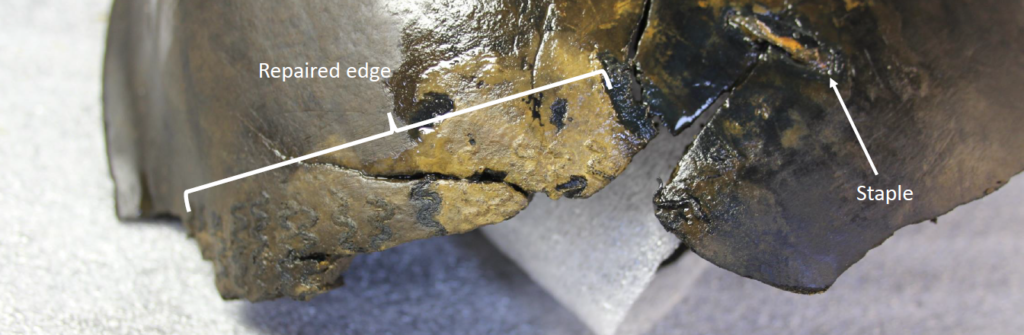
In the archaeological record, it’s not unheard of for bowls to be repaired with a staple made of a non-ferrous metal. The wavy rivets in the Cairns bowl, however, seem to be mostly unique with one notable exception being the traditional ‘tazawat’ milk bowl made and used by the Tuareg people of the Sahara. Some of you may know of the comparable modern fixing, the ‘corrugated fastener’, which is often applied using a power tool similar to a nail gun. However, they are similar in form only; evidently power tools weren’t available in the Iron Age and the rivets in the Cairns bowl weren’t hammered longitudinally across the grain as is mostly done with corrugated fasteners in modern carpentry. Moreover, while straight timber can have a stable flat surface beneath it which can take most of the shock from hammering, the thin curved walls of a bowl have more complex strains within the wood and are much less easy to support. The tension that exists in a round vessel is very different to that of a flat piece of softwood timber. The repairs in the Cairns bowl the rivets have been forced into the endgrain over a curved surface, an altogether more challenging problem.
Replicating the Rivets
Before trying to reconstruct the entire bowl I first resolved to understand the construction of the wavy rivets, a welcome distraction in which to lose myself during the long hours of lockdown. After many failed attempts and broken bowls I succeeded in making and applying a series of wavy rivets to an alder practice bowl that I made when I was learning to use my pole lathe. So in lockdown I once again flexed my experimental archaeology muscles and spent several isolated weeks developing the following method.
Experimentation
Before I eventually stumbled across a workable technique, I ran a series of experiments which were designed to test the specific size, treatment and insertion of the repairs. I had a lot of old copper plumbing fixings lying around so decided to do a first experiment with copper and found, unsurprisingly, that it’s way too flexible to resist the hammering (something I should have known already)!
My tests with brass were much more successful because alloying other metals (zinc and tin in the case of brass) with copper creates a more durable material, and was also much more authentic as the repairs in the original were a form of bronze (copper and tin). While it was certain that a copper alloy should be used, the next issue was to determine the size of the rivets.
According to the scale drawing I had access to at the time the rivets were made from strips approx. 2mm thick, although I soon discovered that the 2mm rivets had to be hammered very hard in order to force their way into the wood which often either caused more cracks or it was simply not possible to force them deep enough into the wood. The only way I could explain this at the time was to hypothesise that as the metal was being hammered, the top surface was buckling and mushrooming out slightly causing the rivets to look wider than they were!
This realisation that the rivets actually needed to be much thinner (an understanding which, having now seen the original artefact and rivets, has proved quite right!) invited another question: how do I stop the much thinner metal buckling during hammering?
For the next round of experiments, I used a slightly curved strip and then hammered the internal curve of the strip. This process both caused the strip to work-harden and resulted in a thinner wedge-shaped cross section. Work-hardening a copper alloy like this makes it harder and more brittle, so it can withstand the blows of the hammer more easily. However, I realised after many mistakes that it’s important not to work-harden and thin the metal too much, or else it will simply break apart when it’s crimped into the wavy shape!
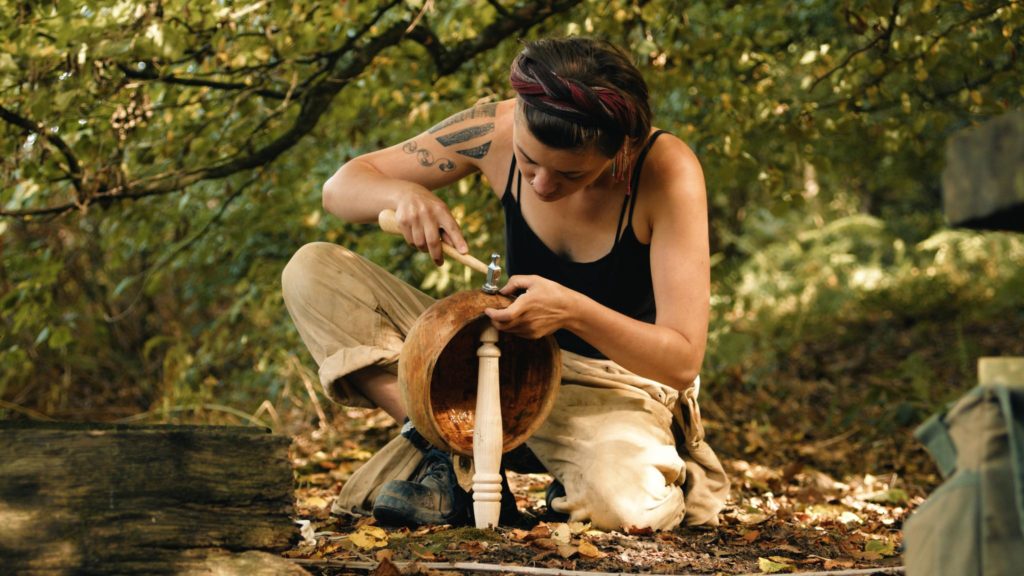
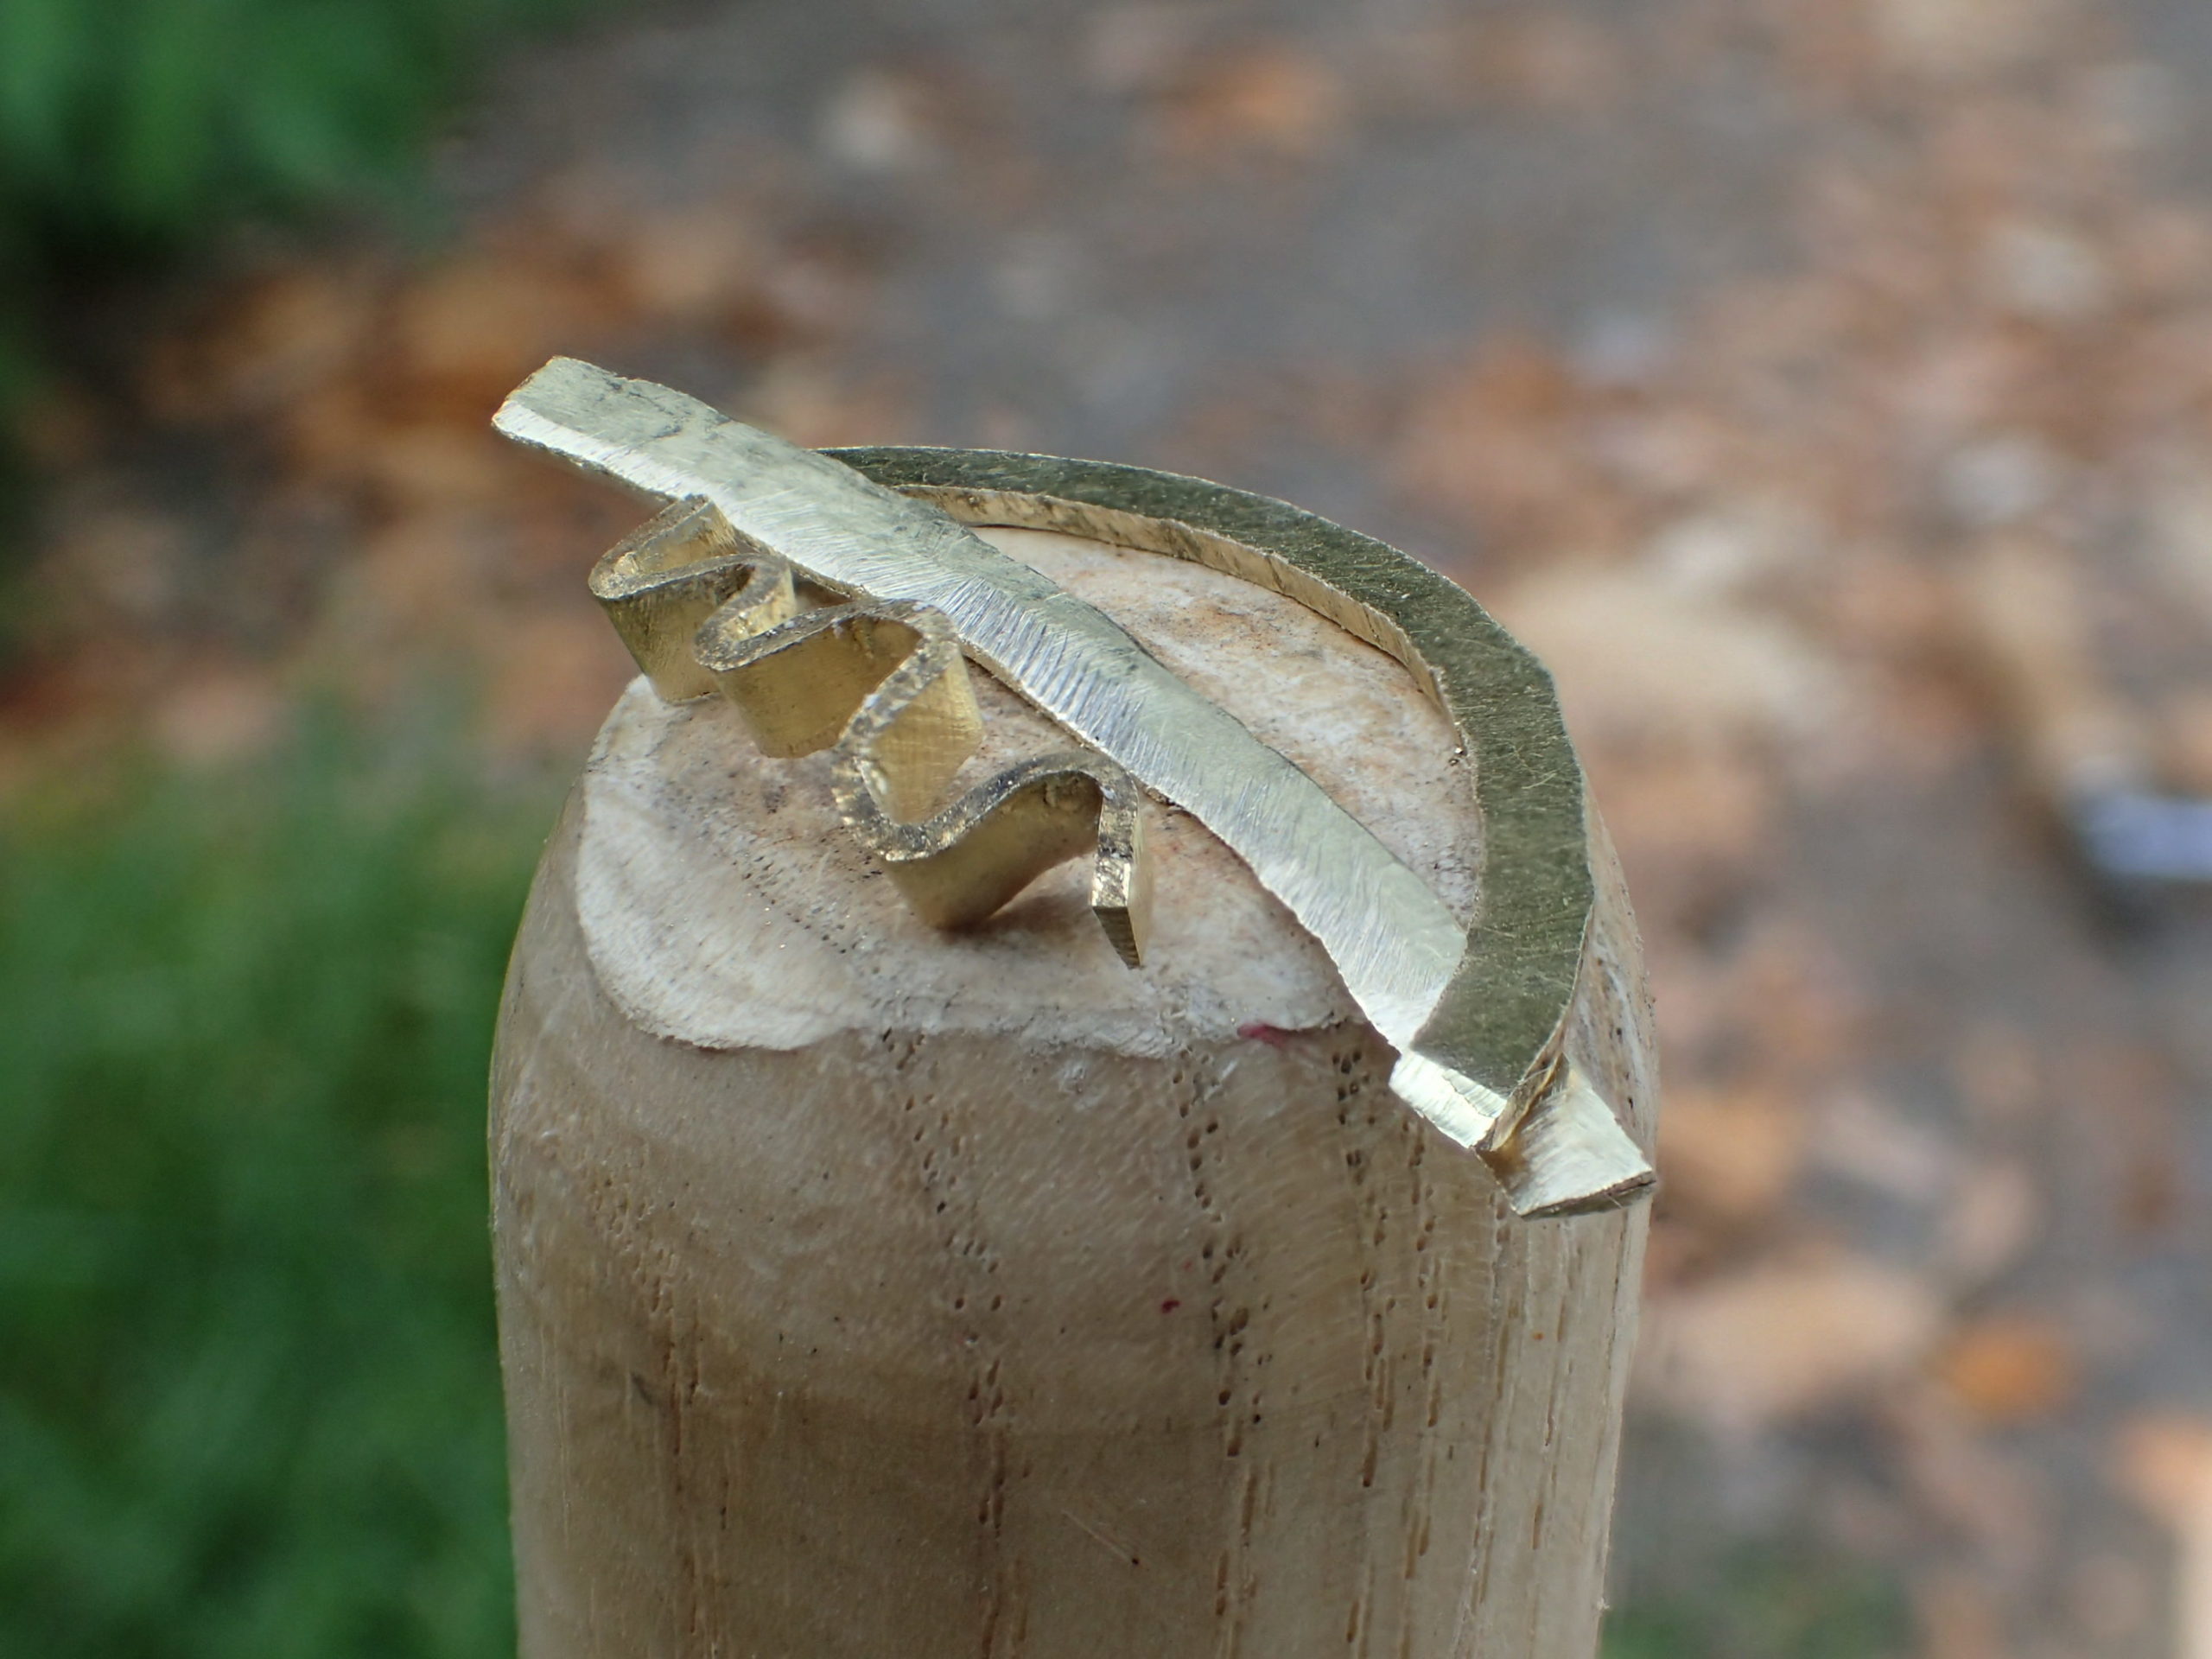
It took a while to refine the optimal size, shape and configuration of these rivets and even more time to perfect the technique for insertion into a cracked bowl. Assuming you have rivets of a good strength and regular shape, hammering them into a bowl should be relatively straightforward. I used a wooden peg, I call it my wooden anvil, to brace the inside of the bowl directly behind where the rivet will go (see the above set-up). This anvil essentially channels the force of the hammer blow down the peg instead of into the bowl and largely eliminates the risk of further damages to the bowl.
The final process
The following four steps briefly represent my method for making these Iron Age fixings:
- Firstly, a slightly curved strip of copper-alloy (I use brass) is cut using a jewellery saw
- The internal curve of the strip is then work-hardened on a small jewellers anvil using a hammer. It can also be filed to create a nicer wedge-shaped cross section at this stage.
- The work-hardened strip can then be crimped using pliers
- The rivet is then firmly hammered across the crack in the end-grain of the bowl. At this stage the bowl must be firmly supported by a wooden peg and it’s important to make sure that the force from the hammer blow is directly transferred into the peg otherwise the bowl may crack further.
This is such an ingenious way of repairing a crack which looks as elegant as it is functional (very). These types of repairs can only be made in areas where it can be hammered directly into the end-grain. When hammered into the wood, the slightly wedge-shaped metal neatly nestles itself in-between the short end-grain fibres and keeps cracks closed, especially when there are several in a row spanning the length of the crack, as is visible in the original. It’s a remarkably simple technique but can be quite technical and fiddly, particularly when making the rivets. There are many pitfalls which it’s easy to fall into, e.g. over-hammering the rivet so it’s too brittle and breaks when bent or making a rivet which extends too deep into the end-grain and causes further breaks. Moreover, it’s important to tailor the size of the rivets to the size, shape and possibly even wood species of the bowl you intend to repair.
Thanks for reading about my obsession with this bowl! I’m currently working on a more comprehensive document which will lay out the above steps in detail and will be freely available to download as a PDF.
To keep up to date with my ongoing experiments with this bowl and its repairs keep an eye on my Instagram or Facebook. For a more in-depth analysis of this process and more about the original artefact then keep an eye out for my upcoming article in the January 2023 issue of Quercus Magazine!
Acknowledgements
Very special thanks to Drs Martin Carruthers and Ben Elliot of UHI for sharing information about the bowl with me, as well as inviting me all the way up to Orkney to see the bowl in person and to have the chance to present my research at the Stromness Museum.
I’ve been absolutely delighted with the videos and stills made for me by the lovely Oscar Garth, so thank you!
Lastly, it has been so lovely to share this information (and obsession) at many of the woodworking gatherings this year, so thank you to everyone who showed an interest and encouraged me to share the information with the woodworking community. Particular thanks to Geoff Hannis, of Tree to Treen, for turning me the lovely chair-leg style wooden anvil seen in some of the photos/vids here!
Curious as to why cold forging was chosen or rather that no heat treatment was used in forming the rivet? I’ve followed this concept down a bit of a rabbit hole of rivet manufacturing and use through the ages, thank you!